CubeCell Series Quick Start
- CubeCell Series Quick Start
- LoRaWAN
There are two methods to install the development framework, choose one of they:
- Arduino Board Manager
- Local File
This topic describes the steps to install the Cubecell development framework through the Board Manager that comes with Arduino.
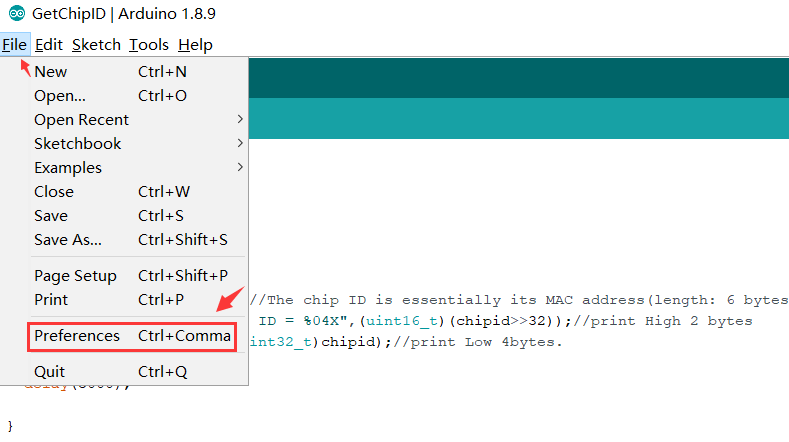
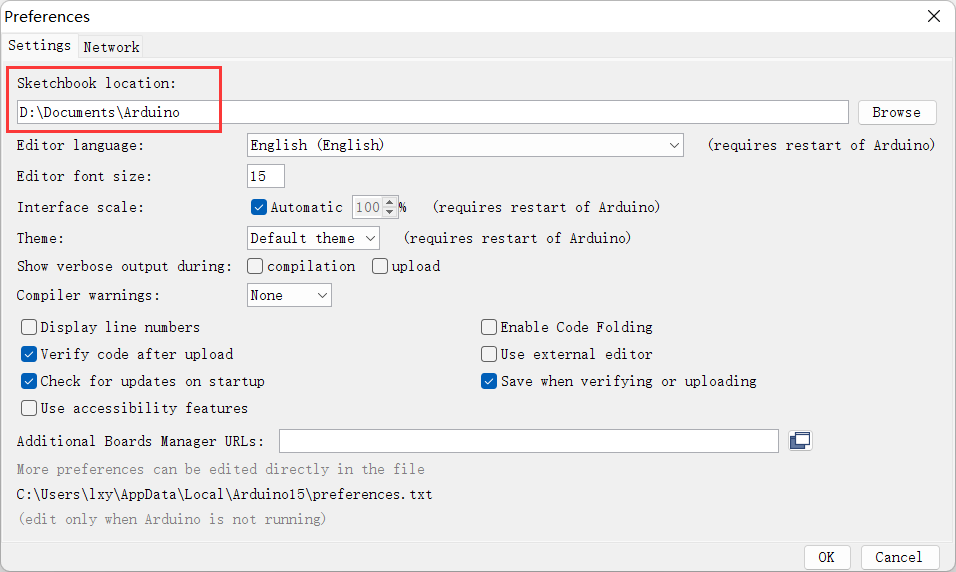
- Open Arduino IDE, and click
File->Peferences->Settings
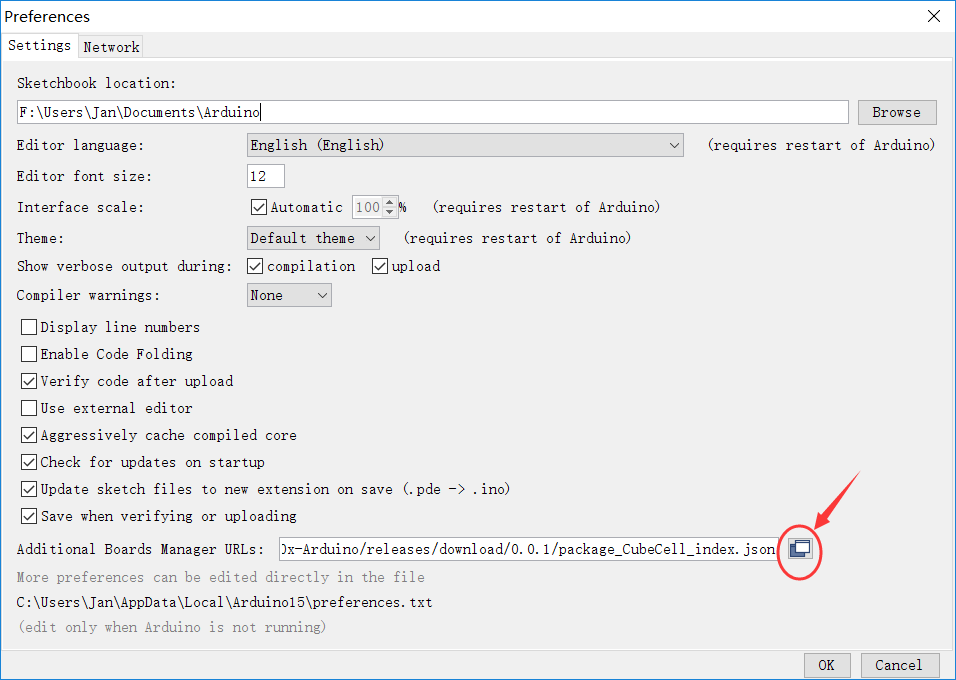
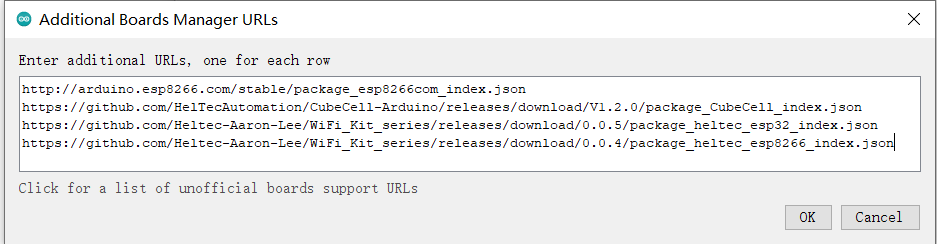
- Input following json url to board manager URLs:
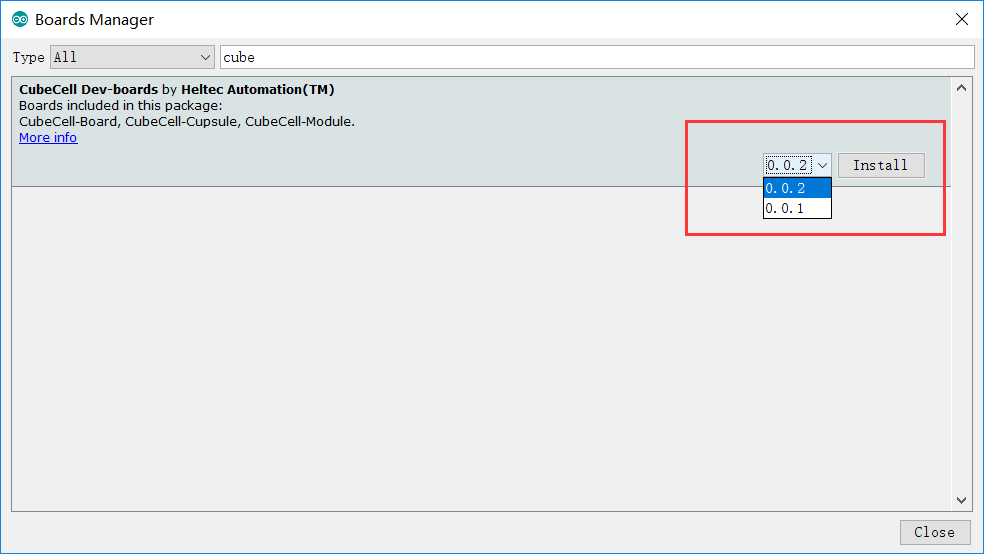
- Click Tools -> Board -> Boards Manager...`, search Heltec cubecell in the new pop-up dialog, select the latest releases and click INSTALL.
Other installation methods can be found here: CubeCell Framework Installation.
This chapter describes how to install the CubeCell development framework by downloading an installer.
-
Download the development framework: https://resource.heltec.cn/download/CubeCell/CubeCell.zip
-
Open Arduino IDE, and click File-> Peferences.
- See the library installation path.
- Open the path. Create a new hardware folder in the Arduino folder. If there is already a "hardware" folder, you don't need to create a new one.
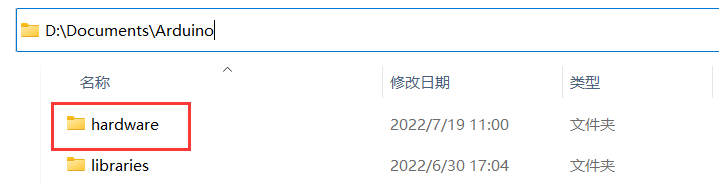
- Unzip the downloaded installation package into hardware.
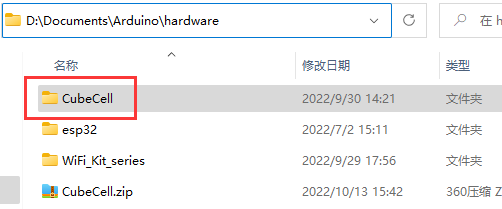
- This is the final correct path, please refer to.

- Restart the Arduino IDE to confirm whether the development environment is installed successfully.
- LoRaWAN Configuration Parameter
- Connect to LoRaWAN server
Config LoRaWAN Networking Parameters for CubeCell (Dev EUI, App Key, etc.)
Summary
No matter what LoRa management platform is used, DevEui, AppKey, etc. parameters are must needed. And ensure that it is consistent with the relevant settings on the server.
- The following parameters are essential for OTAA mode:
- DevEui-- Mote device IEEE EUI (big endian), 8 bytes;
- AppEui -- Application IEEE EUI (big endian), 8 bytes;
- AppKey -- AES encryption/decryption cipher application key, 16 bytes;
- The following parameters are essential for ABP mode:
- NwkSKey-- AES encryption/decryption cipher network session key, 16 bytes;
- AppSKey -- AES encryption/decryption cipher application session key, 16 bytes;
- devaddr-- Device address on the network (big endian), uint32_t;
There are three methods to configuration LoRaWAN networking parameters, choose one of them.
Parameters such as frequency band need to be modified in "Tools".
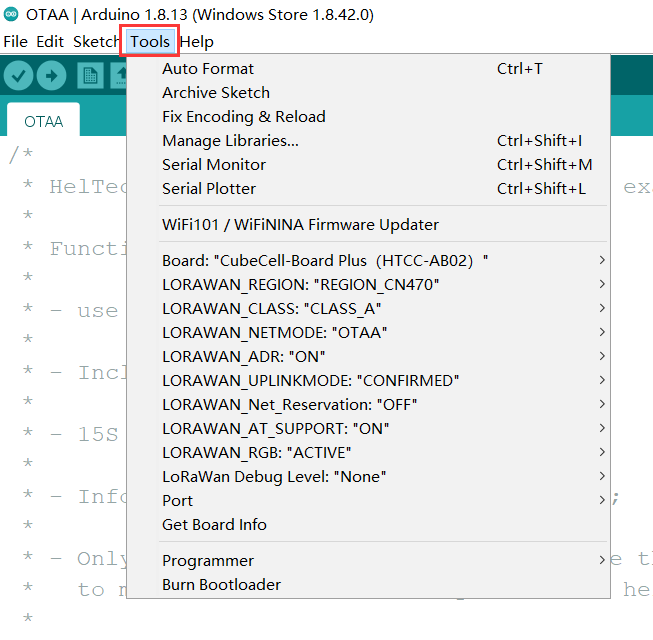
Via Modify Code
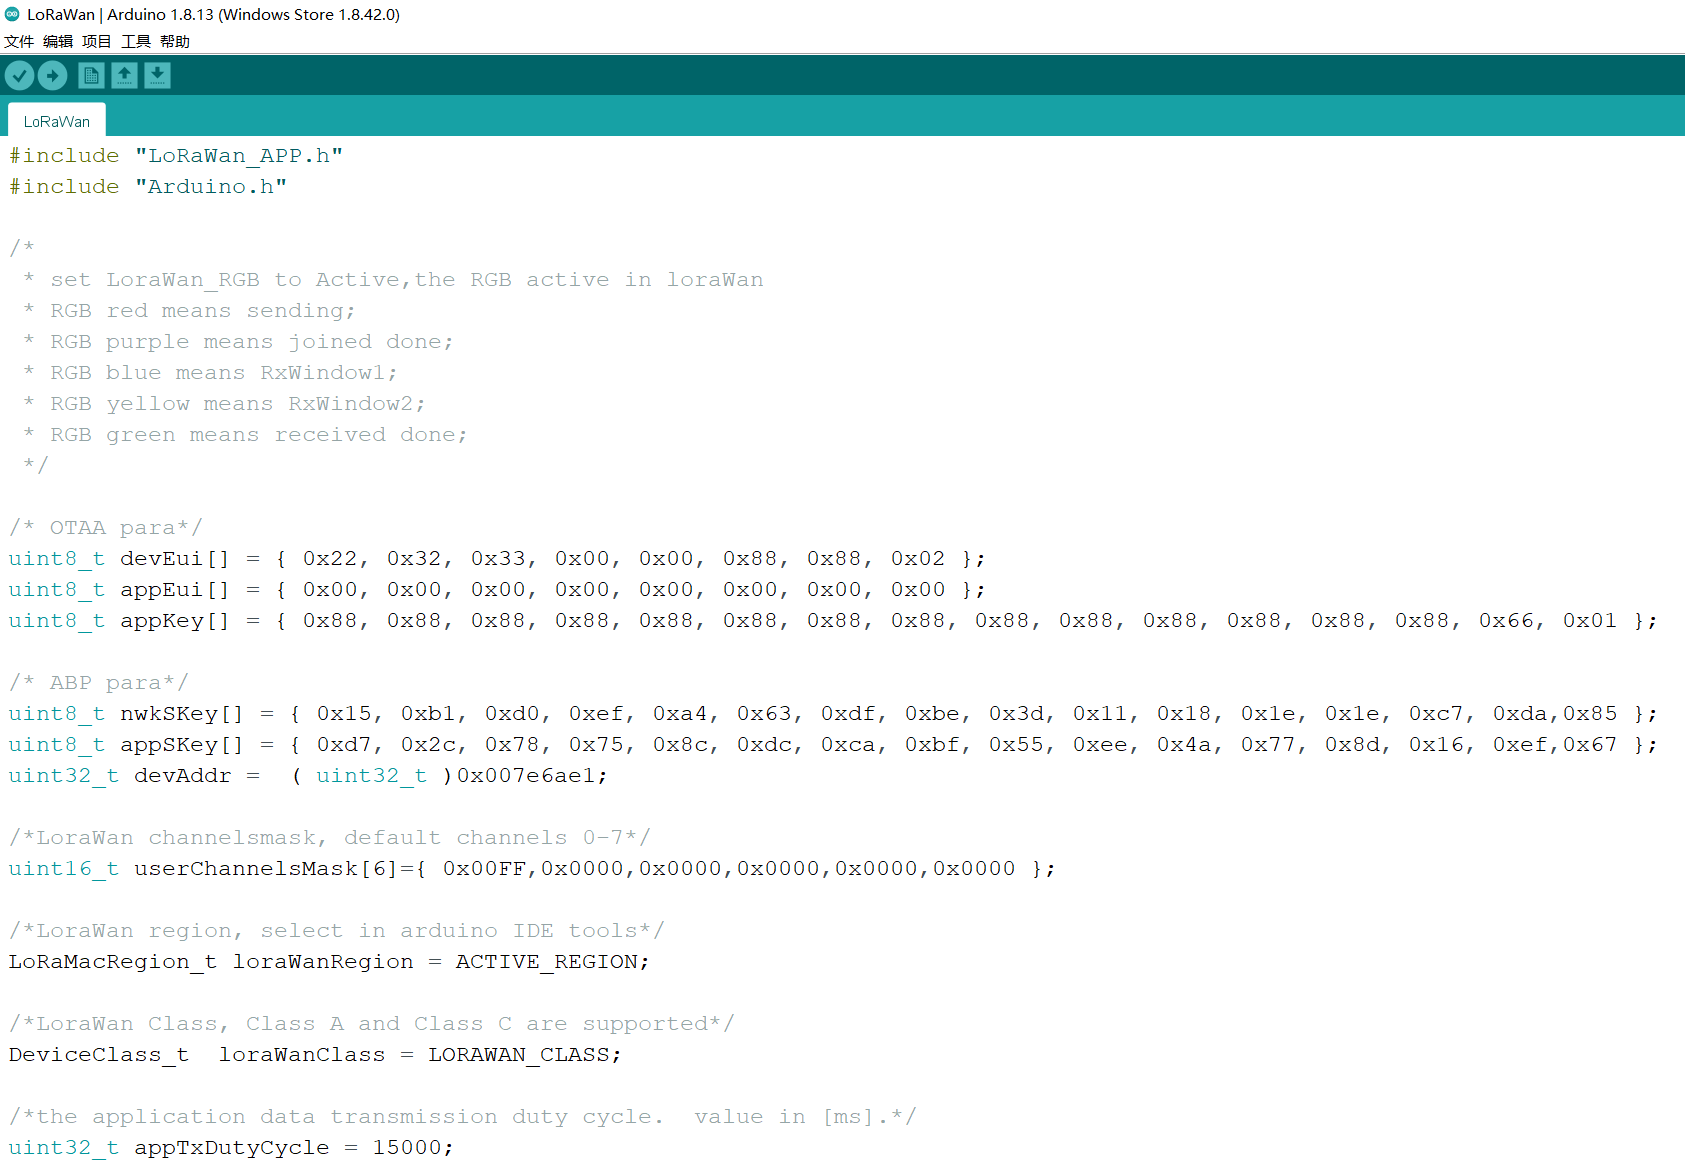
The relevant parameters of the LoRaWAN network are in the corresponding .ino file:
Change the code and Compile/Upload again.
The follows two methods need AT-Command enable.
Via AT Command
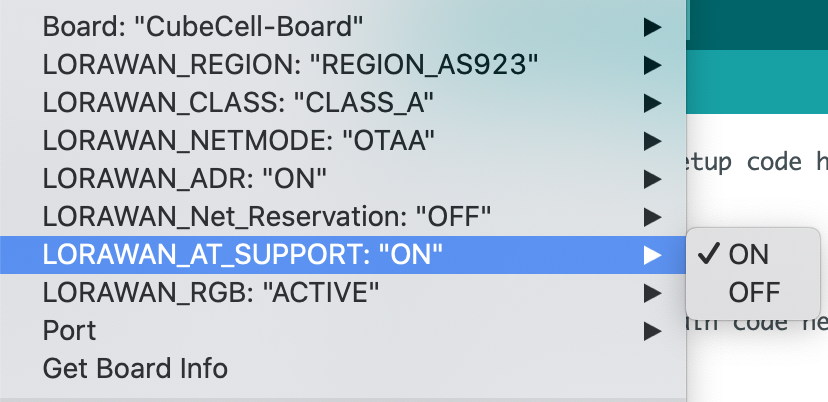
In order to use AT command, need enable AT command in the "Tools" menu before upload.
Serial Port Settings
- Baud rate: 115200
- Stop bit: 1
- Data bits: 8
- DTR, RTS requirement: None
- Ending characters: None
Make sure there is NO ending characters or new line in you serial monitor config!
With AT command support, the CubeCell is sleeping by default. Any content through the serial port will wake it up. It means the First command via serial port only wake up system.
For example, if send any contents such as hello, you will get this reply:
ASR is Waked,LowPower Mode Stopped
DevEui
We take all zero just for example
Config DevEui to "0000000000000000", send following command via serial port:
AT+DevEui=0000000000000000
Command running success will print feedback:
+OK
+DevEui=0000000000000000(For OTAA Mode)
AppEui
Config AppEui to "0000000000000000", send following command via serial port:
AT+AppEui=0000000000000000
Command running success will print feedback:
+OK
+AppEui=0000000000000000(For OTAA Mode)
AppKey
Config AppKey to "00000000000000000000000000000000", send following command via serial port:
AT+AppEui=00000000000000000000000000000000
Command running success will print feedback:
+OK
+AppEui=00000000000000000000000000000000(For OTAA Mode)
NwkSKey
Config NwkSKey to "00000000000000000000000000000000", send following command via serial port:
AT+NwkSKey=00000000000000000000000000000000
Command running success will print feedback:
+OK
+NwkSKey=00000000000000000000000000000000(For ABP Mode)
AppSKey
Config AppSKey to "00000000000000000000000000000000", send following command via serial port:
AT+AppSKey=00000000000000000000000000000000
Command running success will print feedback:
+OK
+AppSKey=00000000000000000000000000000000(For ABP Mode)
(devaddr)=
DevAddr
Config DevAddr to "00000000", send following command via serial port:
AT+DevAddr=00000000
Command running success will print feedback:
+OK
+DevAddr=00000000(For ABP Mode)
Duty Cycle
LoRa Node's default sending data period is 15 seconds, change this period to 60 seconds:
AT+DutyCycle=60000
Reset CubeCell
LoRaWAN parameters need reset to active, CubeCell can reset via three methods:
- Push the RST key;
- Use AT command:
AT+RESET=1 - Provide a ≥10ms LOW signal to RST pin.
Looking for more AT commands? Please refer to CubeCell AT Command list.
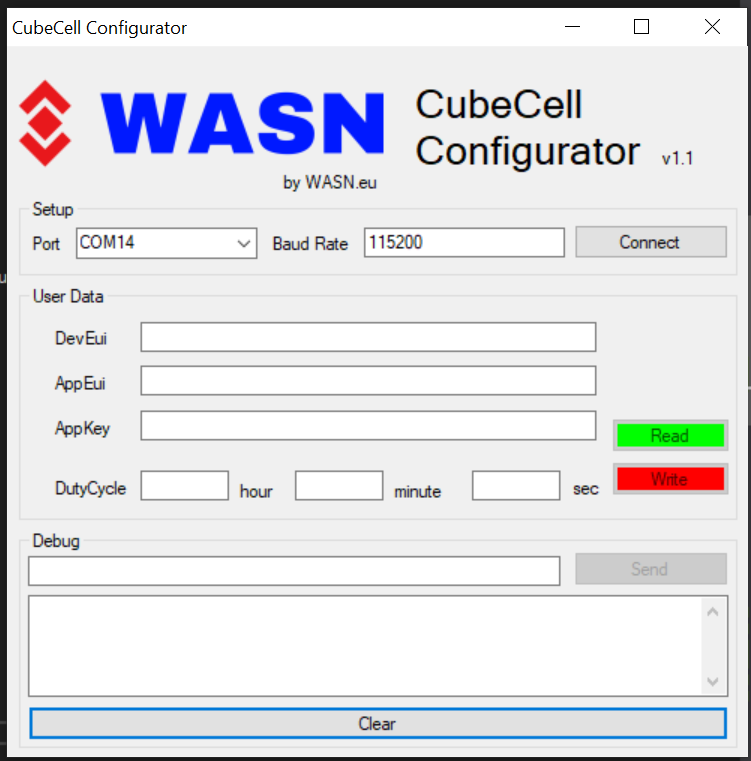
Via CubeCell Configurator
Special thanks WASN made a configurator for CubeCell, now it's only have Windows® support.
https://github.com/wasn-eu/CubeCell_Getting_Started
-
In this document, all operations and tests must be performed with a standard LoRaWAN Gateway, In the CubeCell's LoRaWAN library, for each working band, we are strictly follow LoRaWAN™ 1.0.2 Regional Parameters rB.
Summary
LoRaWAN protocol is the essence of all LoRa applications. In our opinion, the most prominent benefits of LoRaWAN are as follows:
- Very friendly for low power applications. For example, your application need send data to server every 10 minutes, then in a cycle, only ~1 second is in the state of sending, other 9 minutes and 59 seconds are in low sleep low power Consuming status.
- A star network can be formed via a LoRa Gateway, nodes and gateways from different manufacturers can communicate with each other through LoRaWAN protocols;
- The protocol already includes processing mechanisms such as blocking, automatic frequency modulation, and encryption, which can better ensure the smooth flow of nodes and gateway;
- ADR (Adaptive Data Rate).
tipCubeCell LoRaWAN library is migration from LoRaMac-node version v4.3.2
Preparation
- Correct installed Arduino IDE and CubeCell Framework.
- A standard LoRaWAN gateway with at least 8 channels (based on SX1301/8 base band chip will be OK), and make sure your gateway had already connected to a LoRa server.
- [How to connect HT-M01 to a LoRa server]
- [How to connect HT-M02 to a LoRa server]
- [How to connect HT-M01S to a LoRa server]
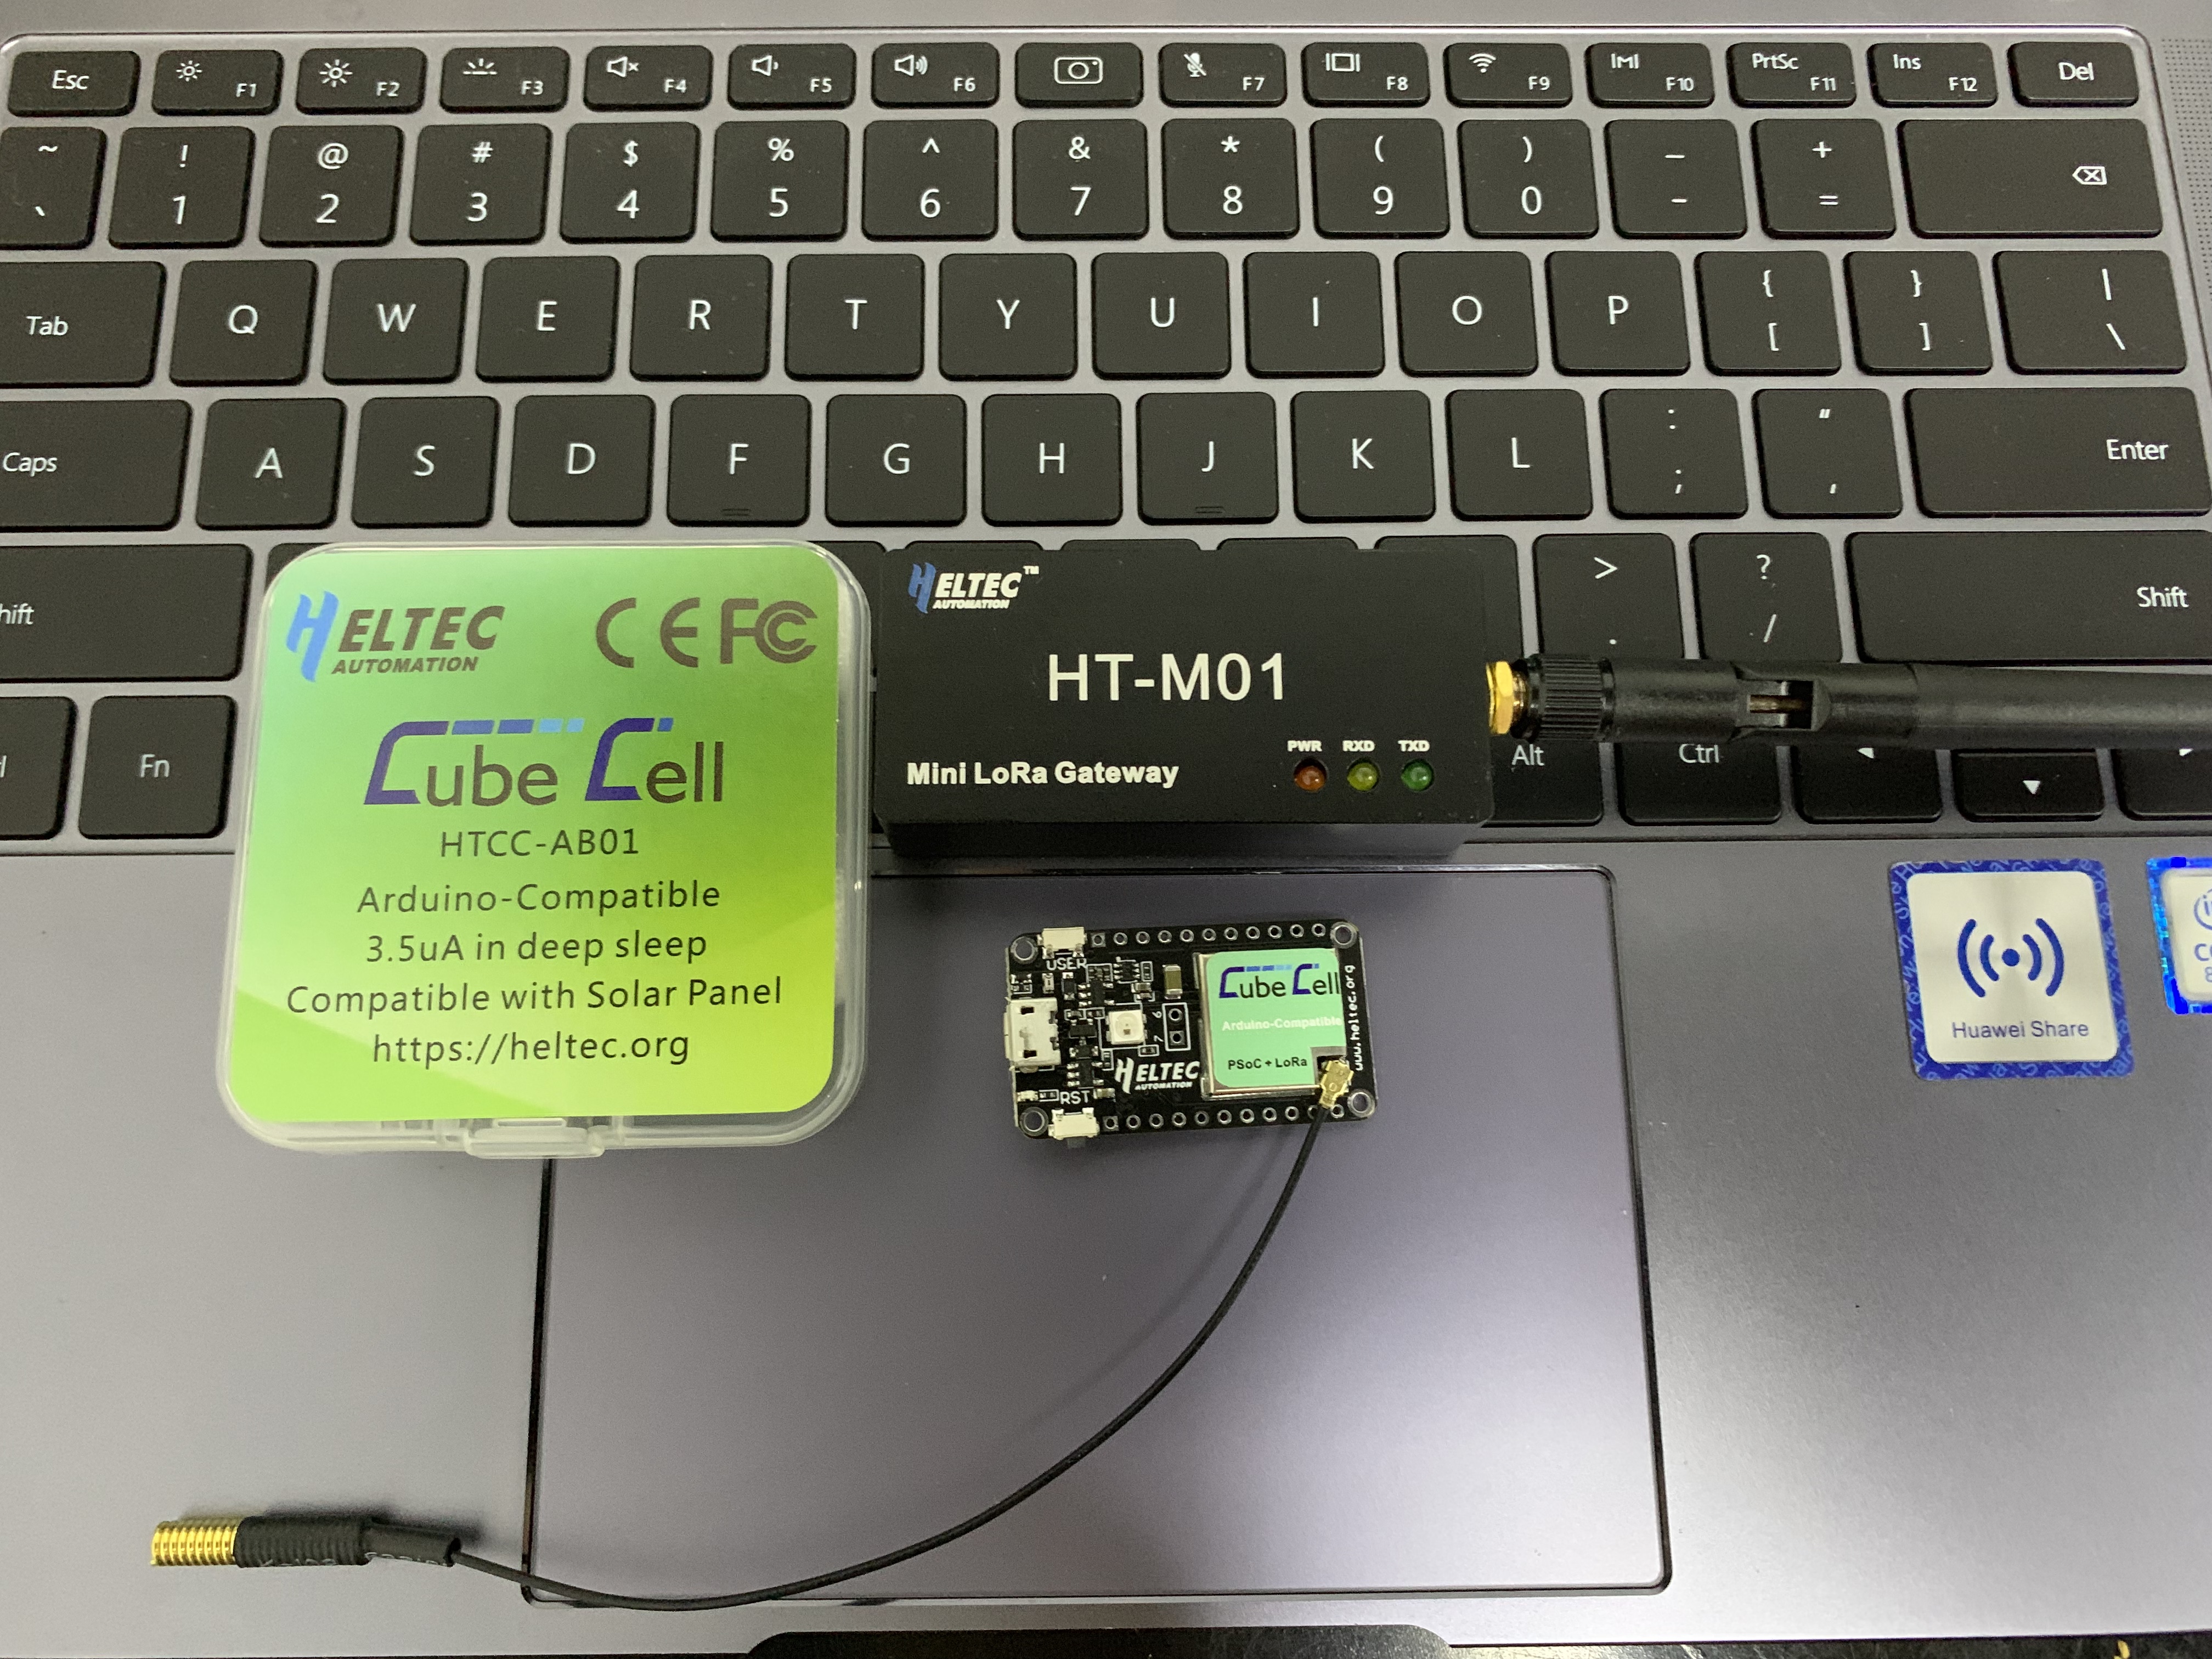
- A CubeCell Dev-Board or CubeCell-Cupsule and a high quality USB cable.
In this example, we use HT-M01 Mini Gateway in Windows® 10. Test band: EU868, others working band is similar.
Running an example in Arduino
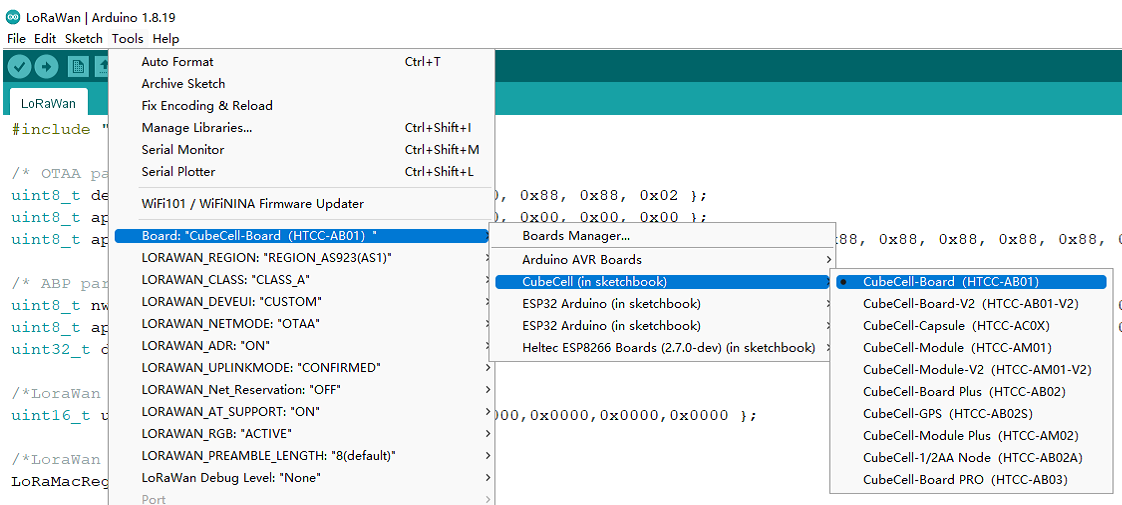
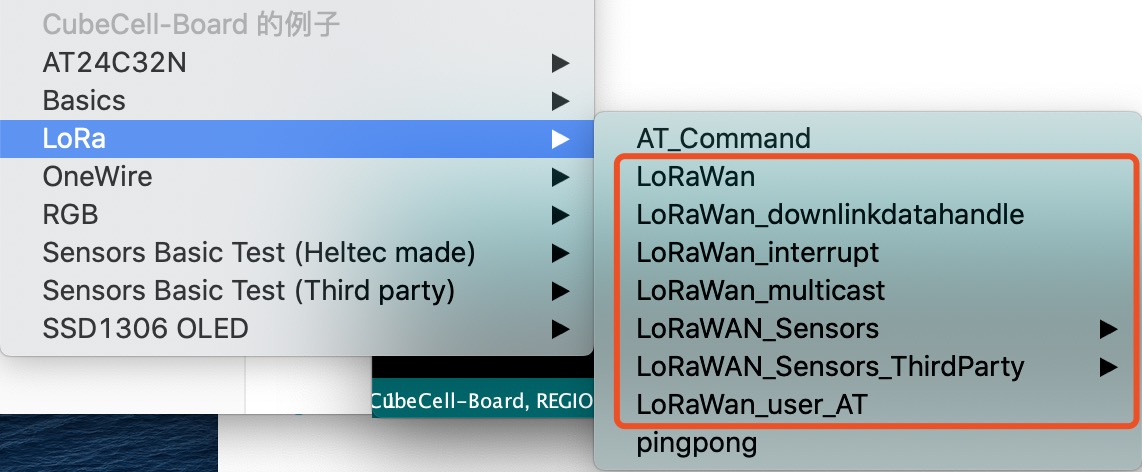
In the "LoRa" path, all examples named with "LoRaWAN_xxx" format are the examples with LoRaWAN protocol, choose one of them.
Don't forget config the parameters in "Tools" menu, here is my configration for EU868:
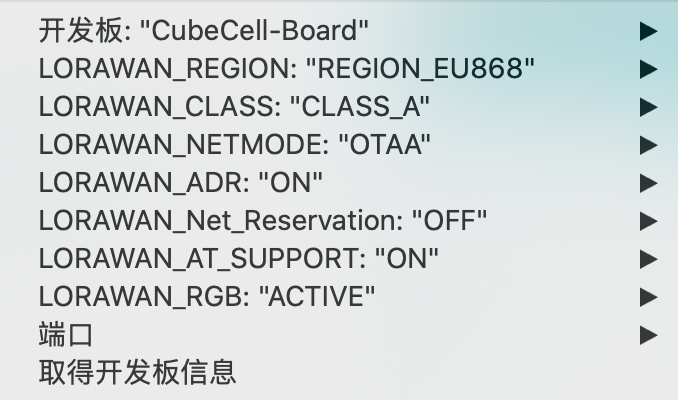 note
notethe tools menu must matching with the configration in LoRa server. For example, if CubeCell use OTAA, the LoRa server must enable OTAA for relevant device.
Connect to TTN/TTS
Before that, make sure there is a LoRa Gateway active in your TTN/TTS account.
Register a device
Register a new device in TTN or TTS “Applications” page. Select the corresponding Brand, Model, Hardware Version, Firmware Version, Region.
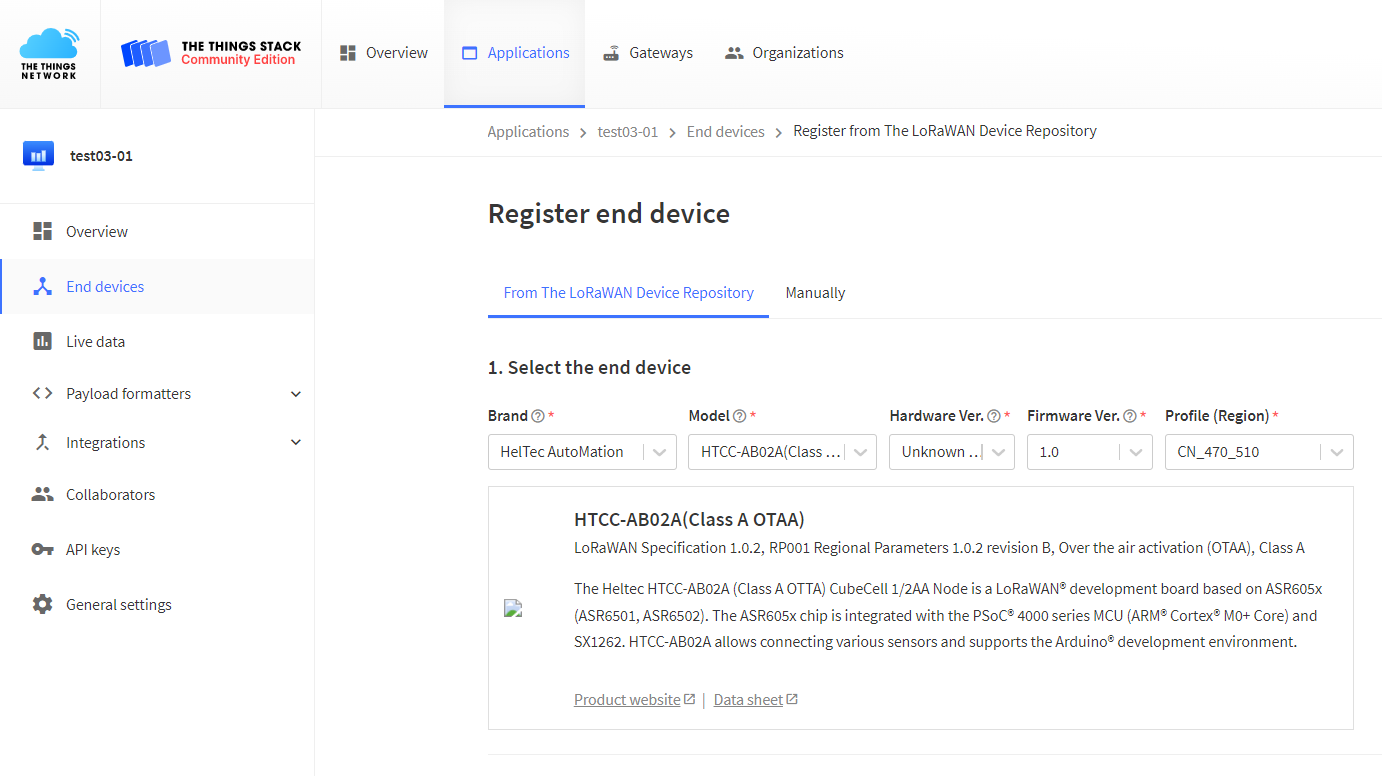
Select the frequency plan, and fill in the corresponding AppEUI, DevEUi, AppKey, and register the device.
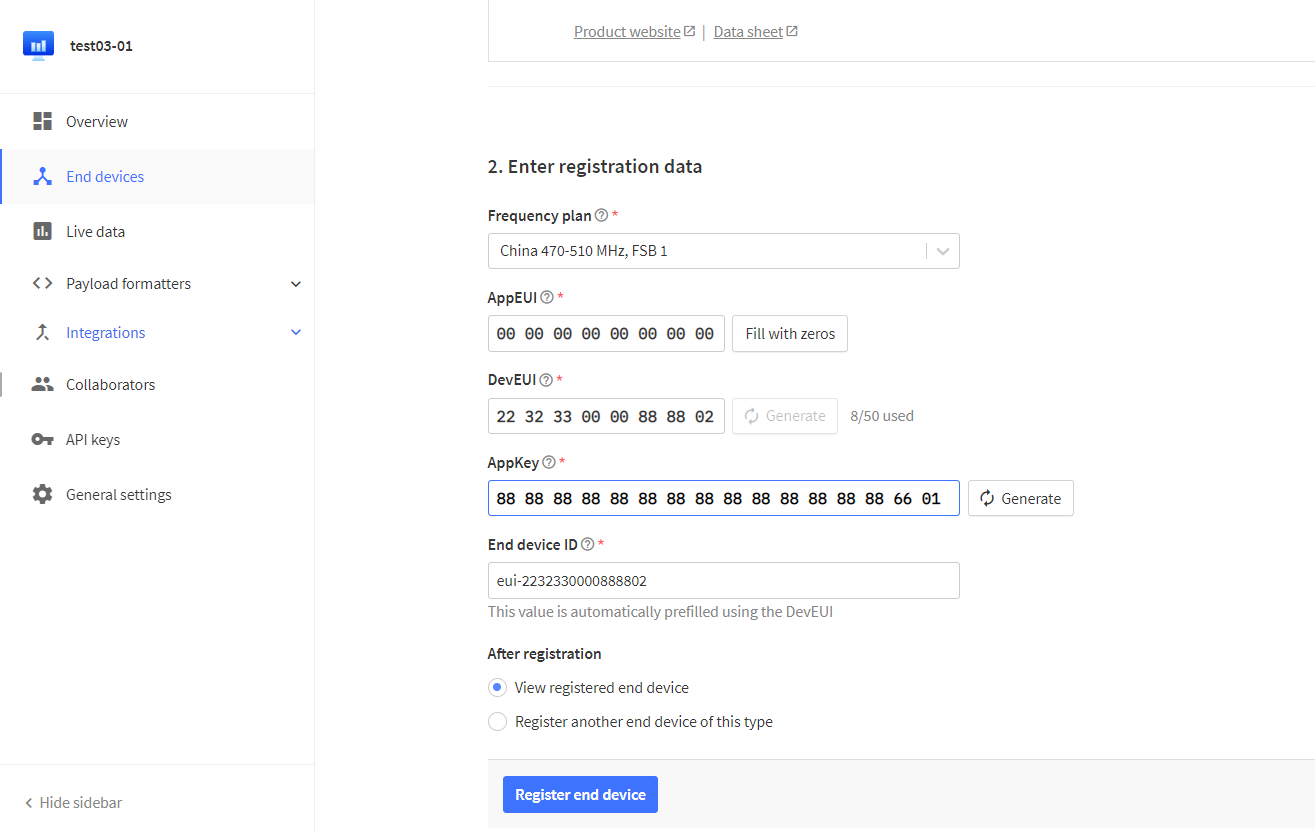
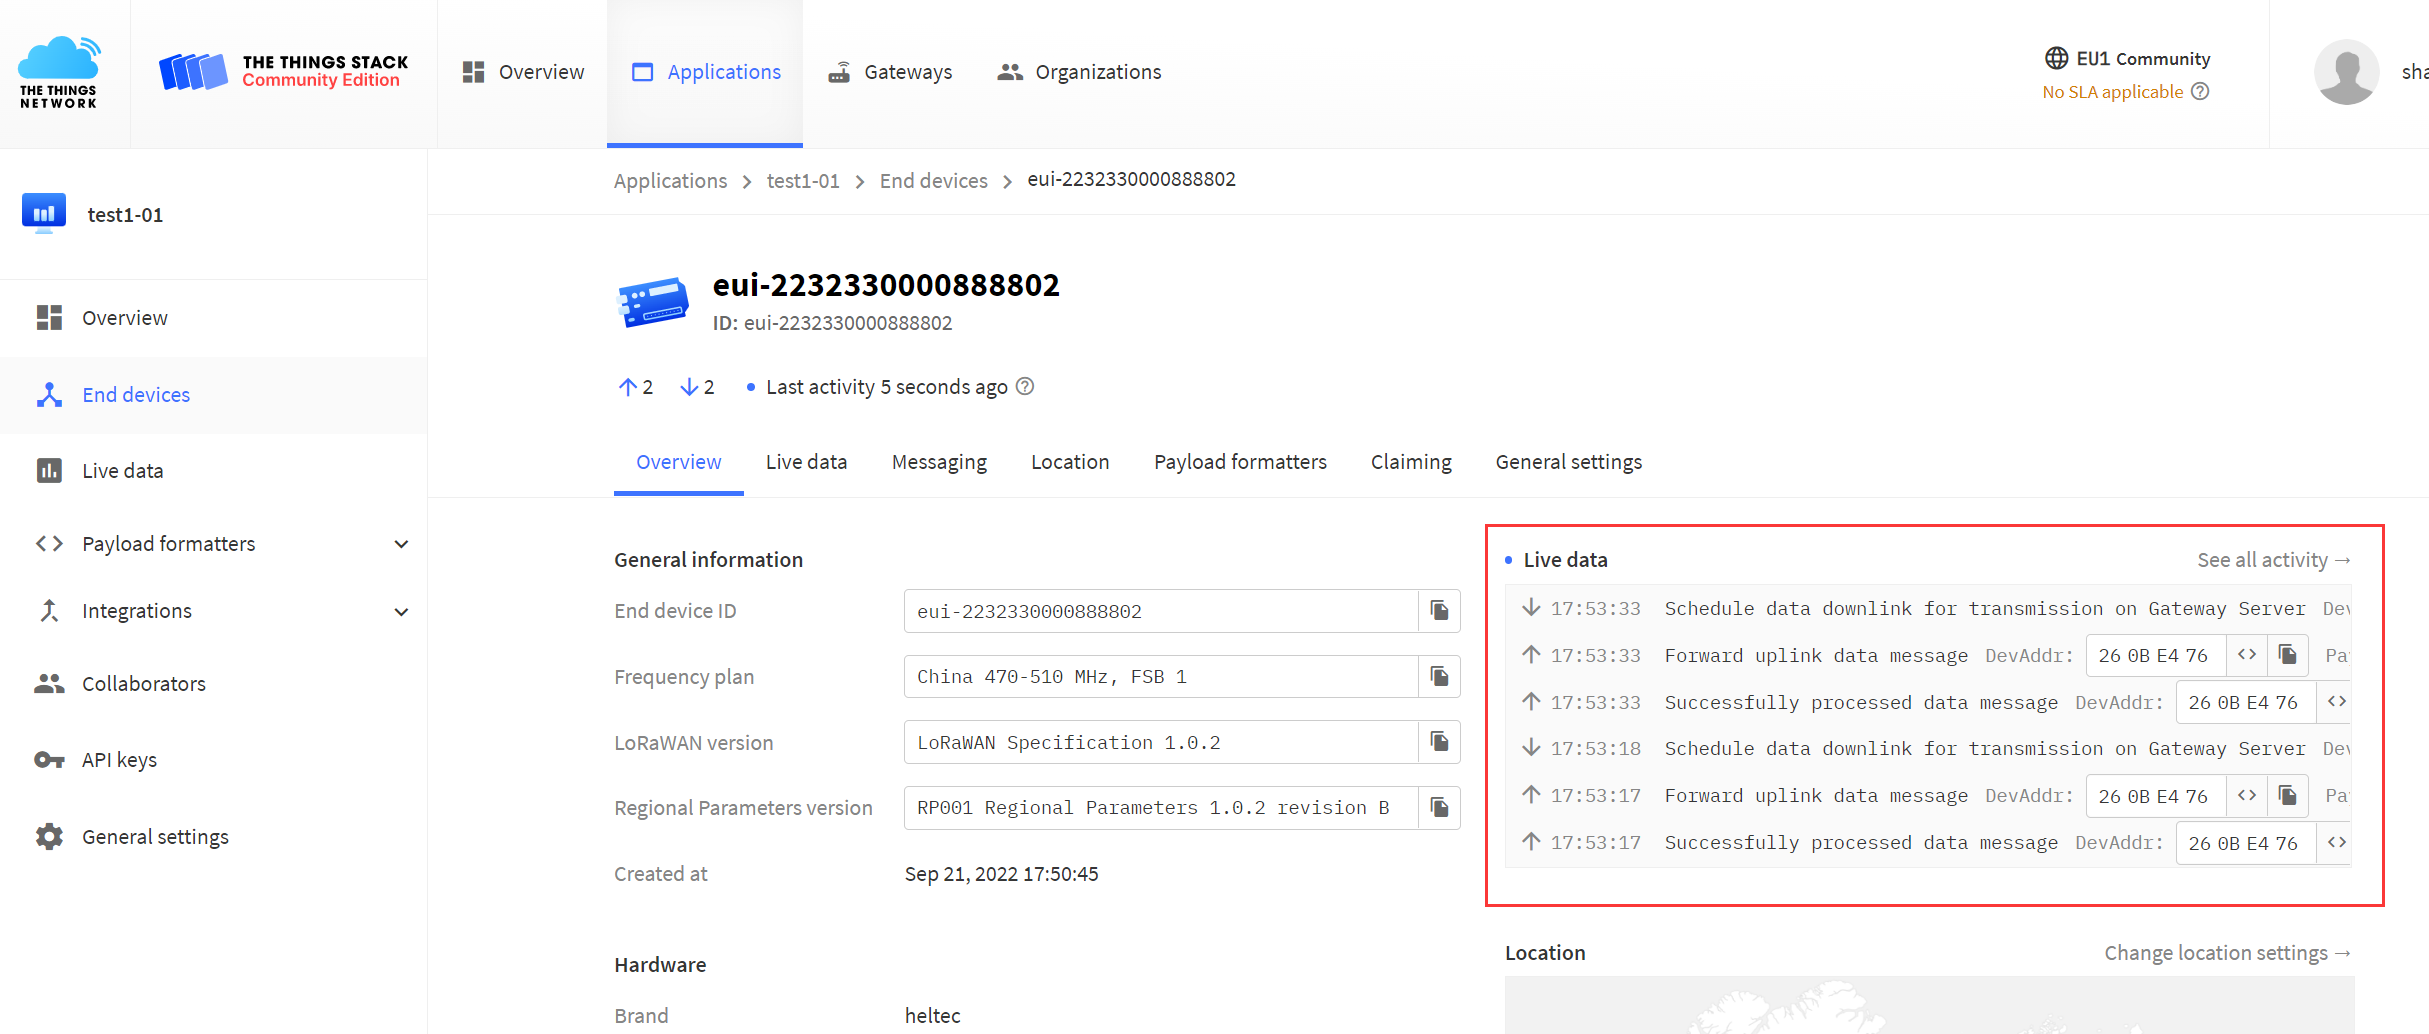
After registration is complete, if all is well, you will see the device active.
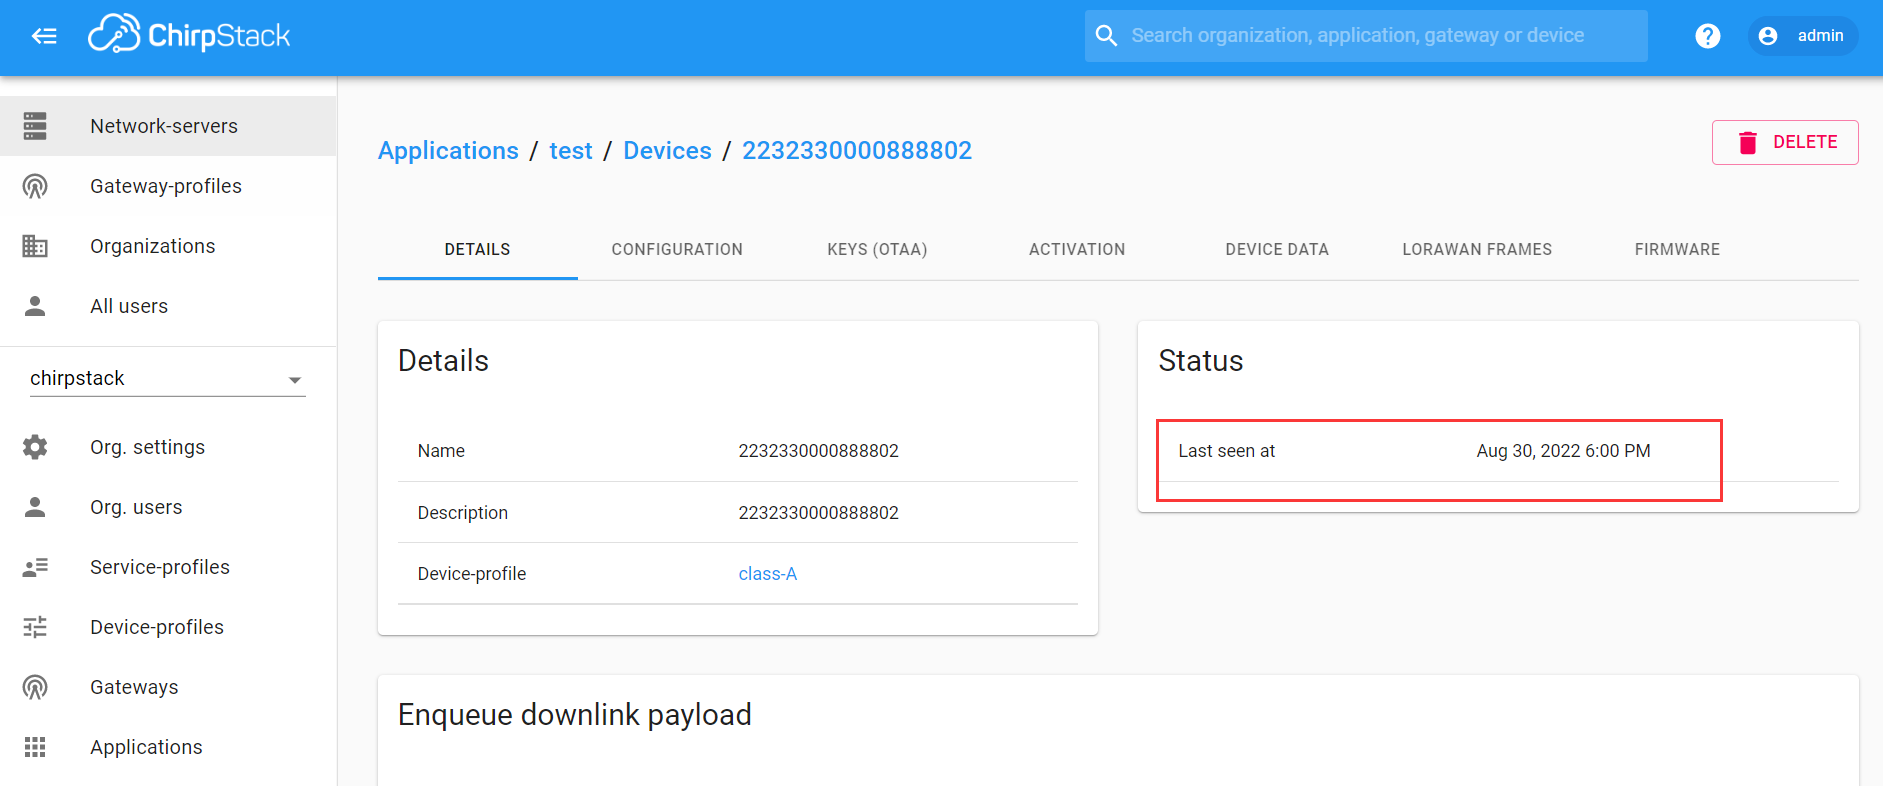
Connect to ChirpStack
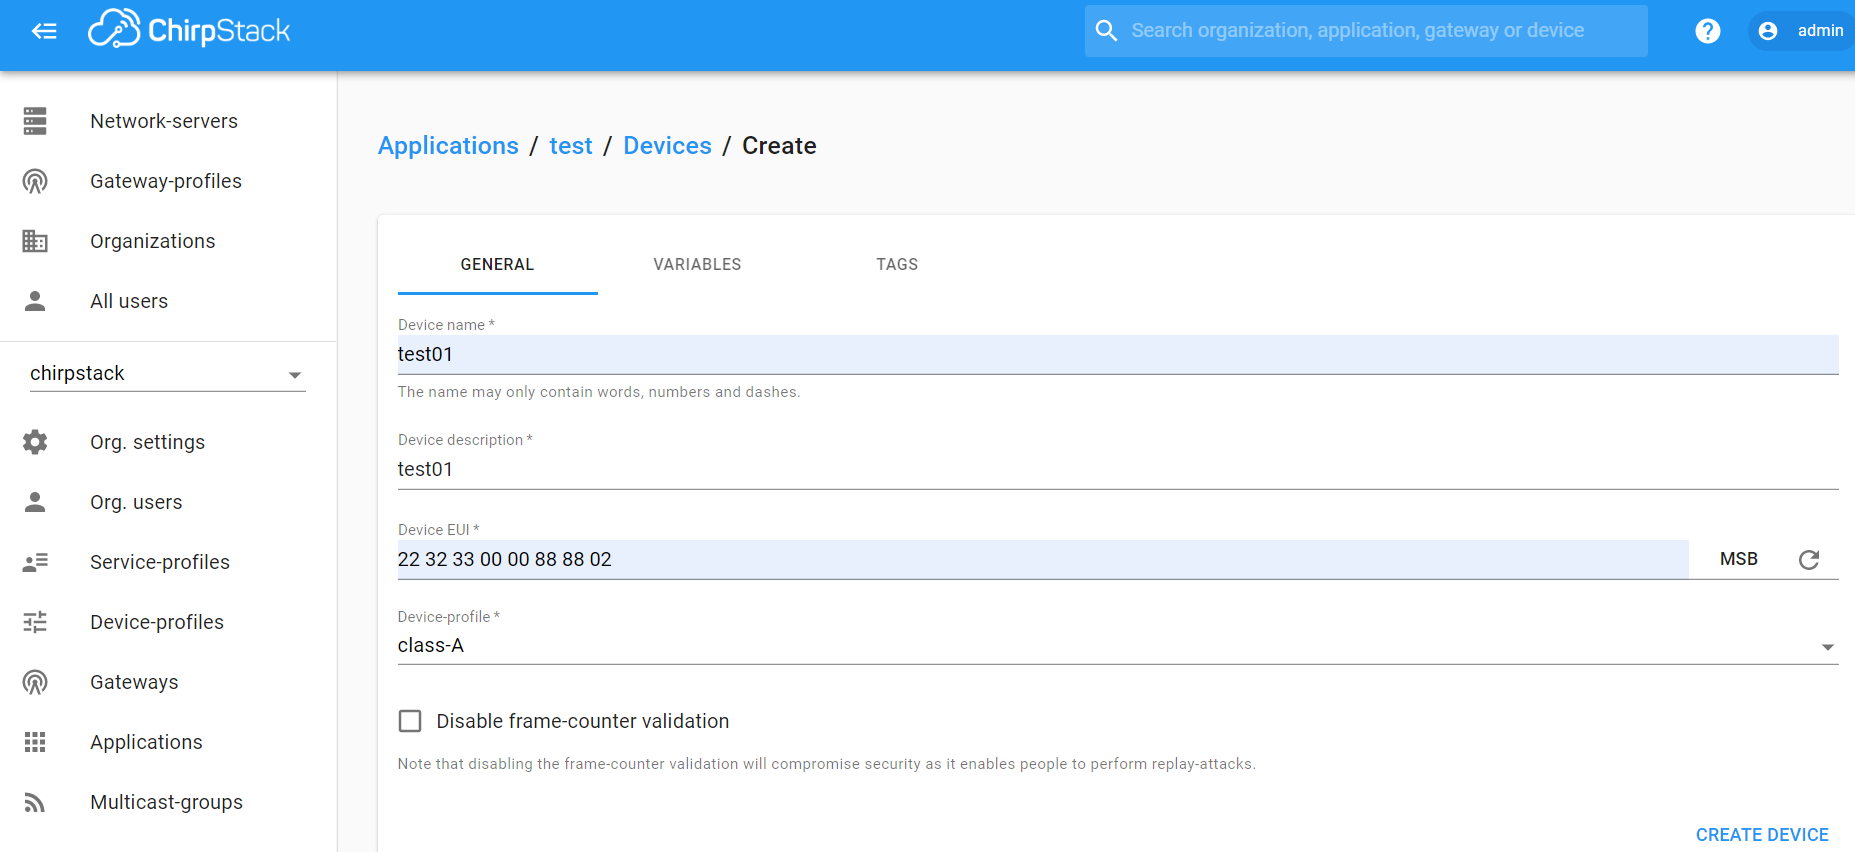
Register a new device in ChirpStack’s “Applications” page. Enter the device name, description, DevEUI. Select Device-profile.
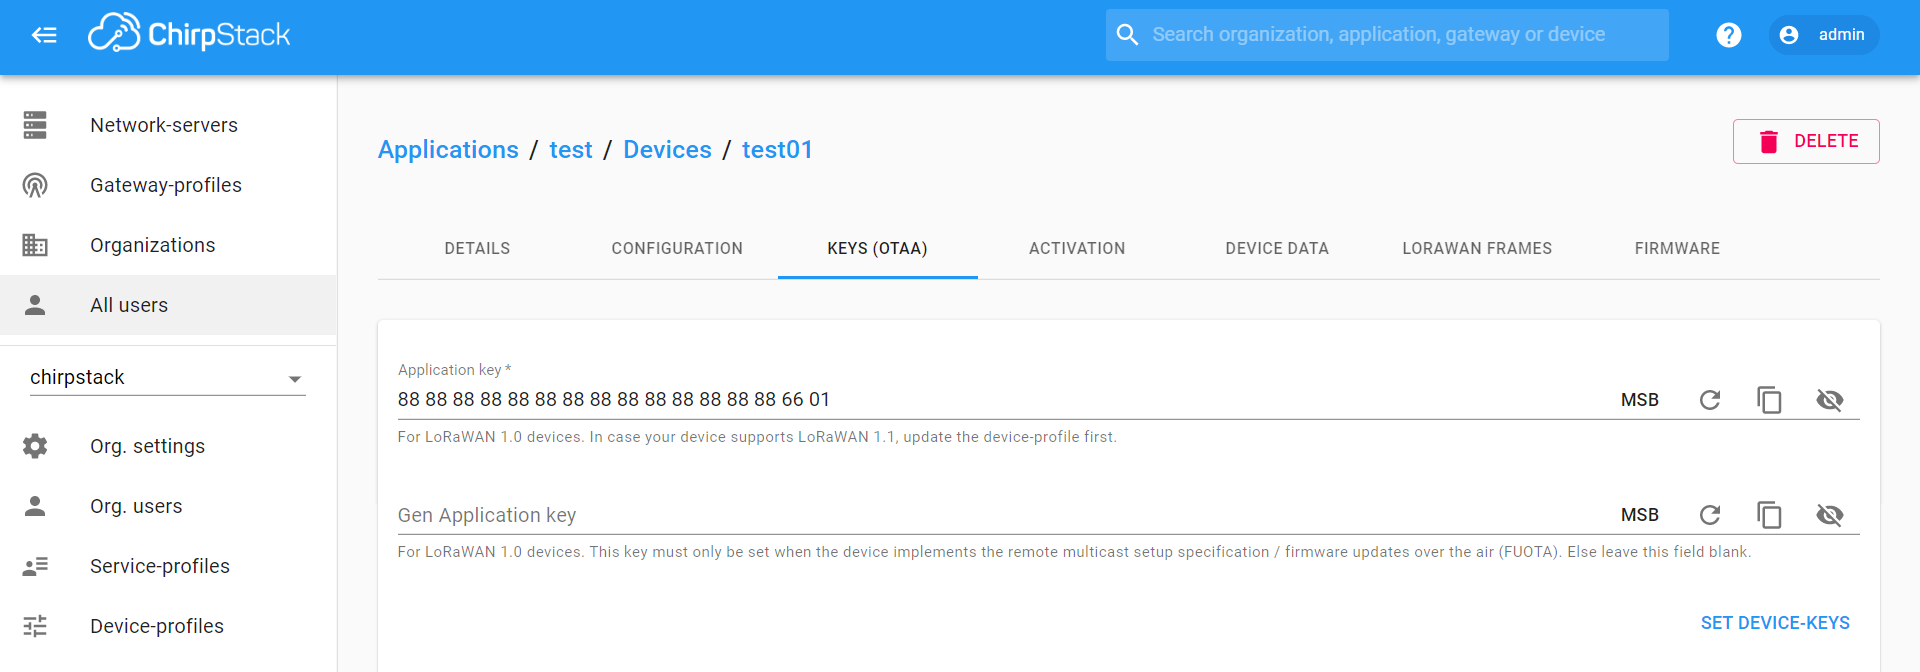
Enter the Application key of the device.
After registration is complete, if all is well, you will see the device active.
Important Hints
Please double check the following two things:
- The LoRaWAN parameters is the same as server!
- The listening frequency of your LoRa Gateway is the same as CubeCell's sending frequency. We strictly follow LoRaWAN™ 1.0.2 Regional Parameters rB;